Windows Server 2016 Domain Controllers: FRS Replication deprecated!
Since the introduction of Windows Server 2008, Microsoft moved away from FRS replication and introduced DFS replication for SYSVOL. With the introduction of Windows Server 2016 the old FRS SYSVOL replication is deprecated. For now (23-06-2017) this means the FRS feature is still there, but you will receive warnings while promoting a Windows 2016 DC and still using FRS. The FRS-feature will be removed in nearby future of new Windows 2016 releases. So migrate your SYSVOL FRS replication to DFSR before introducing new Windows 2016 Domain Controllers to your domain.Customers don’t know they still using FRS SYSVOL replication after Windows 2008 or higher migration
As a consultant I see a lot of customers, which are running Windows 2008 or higher domains/forest functional levels and unconsciously still using the old FRS-replication technique. The FRS-replication is still in place because their domain/forest had a functional level of Windows 2003 R2 or lower in the past. The customer migrated away from Windows 2003 R2 to a domain/forest functional level of Windows 2008 or higher and didn’t migrate to DFSR. When the domain/forest functional level is raised to Windows 2008 or higher the SYSVOL replication doesn’t automatically upgrades to DFSR. You need to do this manually!This is also the case when you install a brand new domain with Windows 2012 R2 DC’s and configure the forest/domain functional level to Windows 2003 R2 or lower. In a domain with functional level of Windows 2003 R2 you can introduce Windows 2003 R2 Domain Controllers and since they don’t have DFSR technology the Windows 2008 or higher DC’s fall back to FRS to communicate with the 2003 R2 DC’s in your domain.
Check if you still using FRS replication
Check if you are still using FRS as follows:- On your Domain Controller the “File Replication Service” is present and is running. Startup type: Automatic.
- In the Application log events appear in the “File Replication Service” log. Which contains information about FRS replication and the message “The File Replication Service is no longer preventing the computer PBO-DC01 from becoming a domain controller….” is registered after a domain controller reboot.
 Visual: The migration process with dfsrmig
The DFSRMIG process has three states:

Preparations
WARNING: Execute the DFS migration on the Domain Controller which has the PDC-emulator role.
INFO: Read the following technet blog for more detailed information about the FRS to DFSR migration: http://blogs.technet.com/b/filecab/archive/2008/02/08/sysvol-migration-series-part-1-introduction-to-the-sysvol-migration-process.aspx
- Create a backup of your domain (systemstate)
- Make sure you know the Active Directory Restore Mode password. If you are not 100% sure, reset the ADRM password to something you know. You will need this password if you want to restore your Active Directory backup.
- Ensure that the domain and forest level is at least Windows 2008 (you can use AD Trusts cpl)
- Check your Domain Controllers with DCDIAG and ensure there are no issues

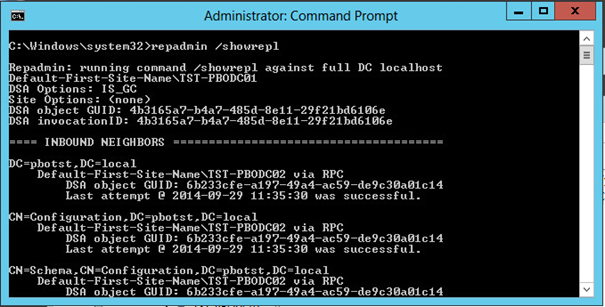
- Check Active Directory replication: repadmin /showrepl . You need to ensure that AD replication is OK.
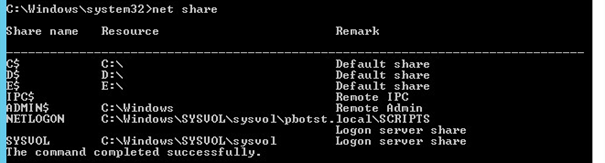
- Check if SYSVOL is shared/ready on every domain controller: net share

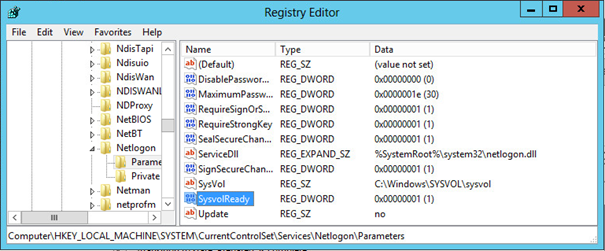
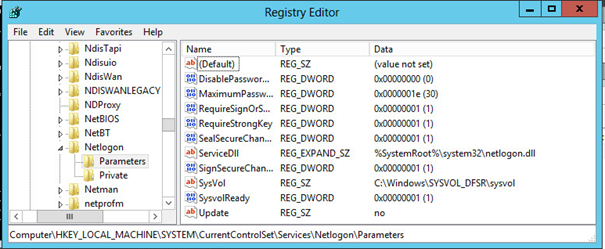
- Check every Domain Controller if SYSVOL is ready: HKLM\System\CurrentControlSet\Services\Netlogon\Parameters\Sysvol [SysvolReady] = 1
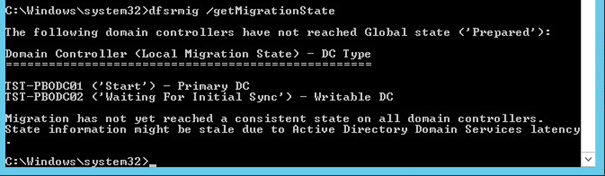
- Check the current DFSR status and ensure you are not half way a DFSR migration already. Dfsrmig /getMigrationState

- Check if the DFS Service is installed on every domain controller:


Phase 1: Migrated to “PREPARED” state
If you have ensured done the preparation and you can fallback to a backup. Your good to go and start the FRS to DFSR migration as follows.
INFO: The prepared state is a state where the DFSR Replication will be introduced parallel of the FRS Replication. When in DFSMig state “PREPARED”, the FRS Replication is leading.
WARNING: The SYSVOL to SYSVOL_DFSR copy is done once, so changes to SYSVOL are not replicated to SYSVOL_DFSR!
=============================================
DFSR has successfully migrated the Domain Controller PBO-DC-01 to the 'PREPARED' state.
TO CONTINUE MIGRATION: If you choose to continue the migration process and proceed to the 'REDIRECTED' state, please note that any changes made henceforth to the SYSVOL share located at C:\Windows\SYSVOL (which is under NTFRS replication) will not be updated in the SYSVOL_DFSR folder located at C:\Windows\SYSVOL_DFSR (which is under DFSR replication). To avoid this possibility of data loss, please make sure no file system changes on the SYSVOL share occur while DCs are migrating from 'PREPARED' to 'REDIRECTED' state.
TO ROLLBACK MIGRATION: If you choose to rollback the migration process and return to the 'START' state, please note that DFSR will no longer be replicating the SYSVOL_DFSR folder and all DFSR information will be removed from the Active Directory.
Additional Information:
Sysvol NTFRS folder: C:\Windows\SYSVOL
Sysvol DFSR folder: C:\Windows\SYSVOL_DFSR
Domain Controller: PBO-DC-01
=============================================
- Execute command dfsrmig /setGlobalState 1
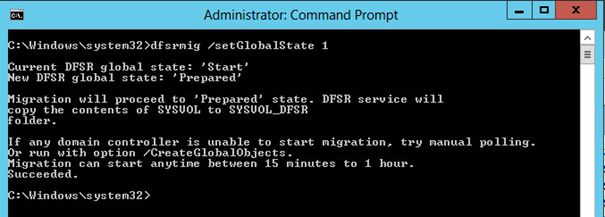
- Check the progress with command: dfsrmig /getMigrationState


Output – Completed:

Phase 2: Migrate to “REDIRECTED” state
INFO: In a redirected state the DFSR will become primary. In this state you still have the opportunity to rollback to FRS replication.
WARNING: There could be data loss when rolling back to FRS replication:
=============================================
DFSR has successfully migrated the Domain Controller PBO-DC-01 to the 'REDIRECTED' state. DFSR is now replicating the SYSVOL_DFSR folder located at C:\Windows\SYSVOL_DFSR.
TO CONTINUE MIGRATION: If you choose to continue the migration process and proceed to the 'ELIMINATED' state, please note that it will not be possible to revert the migration process. Once migration reaches the 'ELIMINATED' state, the SYSVOL folder located at C:\Windows\SYSVOL will be deleted and NTFRS will no longer replicate it. All the NTFRS related information in the Active Directory will be deleted. After that, DFSR will be solely responsible for the SYSVOL share replication process on the Domain Controller PBO-DC-01.
TO ROLLBACK MIGRATION: If you choose to rollback the migration process to the 'PREPARED' state, any changes made after moving to the 'REDIRECTED' state to the SYSVOL_DFSR folder located at C:\Windows\SYSVOL_DFSR (which is currently under DFSR replication) will not be updated in the SYSVOL share located at C:\Windows\SYSVOL (which is under NTFRS replication). To avoid this possibility of data loss post rollback, please make sure that no file system changes on the SYSVOL share occur while DCs are migrating from 'REDIRECTED' to 'PREPARED' state.
After rollback, NTFRS will replicate the SYSVOL share located at C:\Windows\SYSVOL and DFSR will continue replicating the SYSVOL_DFSR folder located at C:\Windows\SYSVOL_DFSR. However, NTFRS will still primarily be responsible for the SYSVOL share replication process on the Domain Controller PBO-DC-01.
Additional Information:
Sysvol NTFRS folder: C:\Windows\SYSVOL
Sysvol DFSR folder: C:\Windows\SYSVOL_DFSR
Domain Controller: PBO-DC-01
=============================================
- Check if SYSVOL folder is still shared: net share

- Check if SysvolReady has value 1

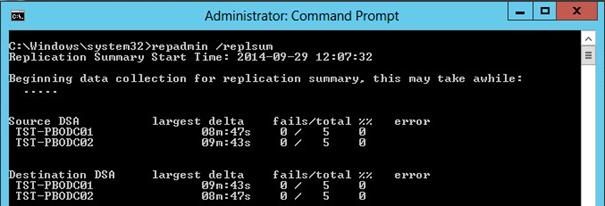
- Check if the AD replication is still OK: repadmin /showrepl or repadmin /replsum
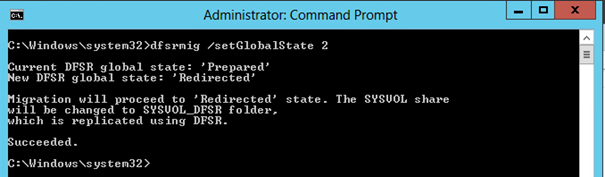
- Execute the following command to get to the REDIRECTED state: dfsrmig /setGlobalState 2
- Check the progress with command dfsrmig /getMigrationState


 Output – Completed:
Phase 3: Migrate to “ELIMINATED” state
WARNING: There is no rollback possibility to FRS when migrated to the ELIMINATED state.
- Check if SYSVOL folder is still shared: net share
- Check if SysvolReady has value 1
- Check if the AD replication is still OK: repadmin /showrepl or repadmin /replsum
- Execute the following command to get to the ELIMINATED state: dfsrmig /setGlobalState 3
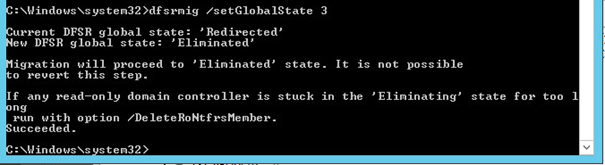
- Check the progress with command dfsrmig /getMigrationState


Output – Completed:

When done, the following events are in the event viewer:


